
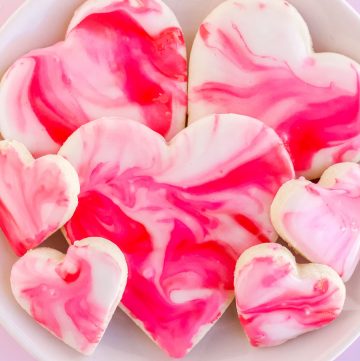
Valentine’s Day cookies make a beautiful and unique treat for your loved ones who will adore it! It’s a mess-free easy recipe that requires basic ingredients available in every pantry. They have soft centers and crunchy edges. And this is a great way to say “I Love You” to the special people in our lives!

The marble cookies are perfect for Valentine’s Day, but are also great for Mother’s Day, birthdays, and other special occasions!
They hold their cookie-cutter shape while in the oven and have a flat surface which makes decorating them a breeze.
This is the easiest way to make beautifully decorated Valentine’s Day cookies. To make them, you don’t need to use any icing tips, nor piping bags. This makes life much easier, because who wants to bother by filling piping bags or squeeze bottles with icing and all the mess and the cleaning that results out of that!
So using the easy glaze icing that this recipe calls for, makes decorating Valentine’s Day cookies a perfect activity to do with children. The kids will love doing this and the result is guaranteed to get fantastic colorful cookies! Even young kids can make perfectly shaped heart cookies with this recipe!
The Ingredients for Valentine’s Day Cookies:
The ingredients needed to make the marble cookies are very simple and available at every pantry which makes it approachable for everyone. All what you need is:
Butter, granulated sugar, salt, eggs, pure vanilla extract and all-purpose flour.
For the glaze icing, you’ll need the following ingredients:
Confectioners’ sugar, milk, corn syrup and food coloring.
The corn syrup makes the glaze icing glossy and shiny, so use it if you care about having beautiful shiny icing. While the confectioners’ sugar makes the icing thick. So you can add more or less of confectioners’ sugar until you reach the desired consistency.
Tools needed:
To make these adorable cookies you’ll need the following tools:
- Heart-shaped cookie cutter
- Rolling pin
- Baking sheet, these are the ones that I use for all the baking that I do!
- Parchment paper or silicon baking mats
- Cooling rack, I love this 3-tier cooling rack as it saves so much space.
- Stand or hand mixer, a kitchen essential.
- Measuring cups
How to Make Valentine’s Day Marble Cookies?
Making cookie dough is very easy and requires very simple ingredients. The dough is soft and thick. It’s important to allow it to chill in the refrigerator for one hour after rolling it out, so you don’t end up working with cold dough.
Plus, chilling in the refrigerator firms the dough up making it easier to hold its shape and avoid spreading while being baked in the oven. So please don’t skip this step! After chilling, cut the dough with a cookie cutter and bake.
To make the cookie dough:
- Beat the butter and sugar with an electric mixer at medium speed.
- Add the eggs, vanilla, and salt and continue blending until thoroughly combined.
- Slowly add the flour and continue mixing until combined.
- Roll the dough on parchment paper or silicone baking mats about a half of an inch thick and place it on baking sheets. Let it chill in the refrigerator for 1-2 hours slightly covered. Chilling the dough is important to get sharp and precise shapes. Note that the dough can be refrigerated for up to 48 hours.
- While the dough is chilling, preheat the oven to 350°F/180°C degrees.
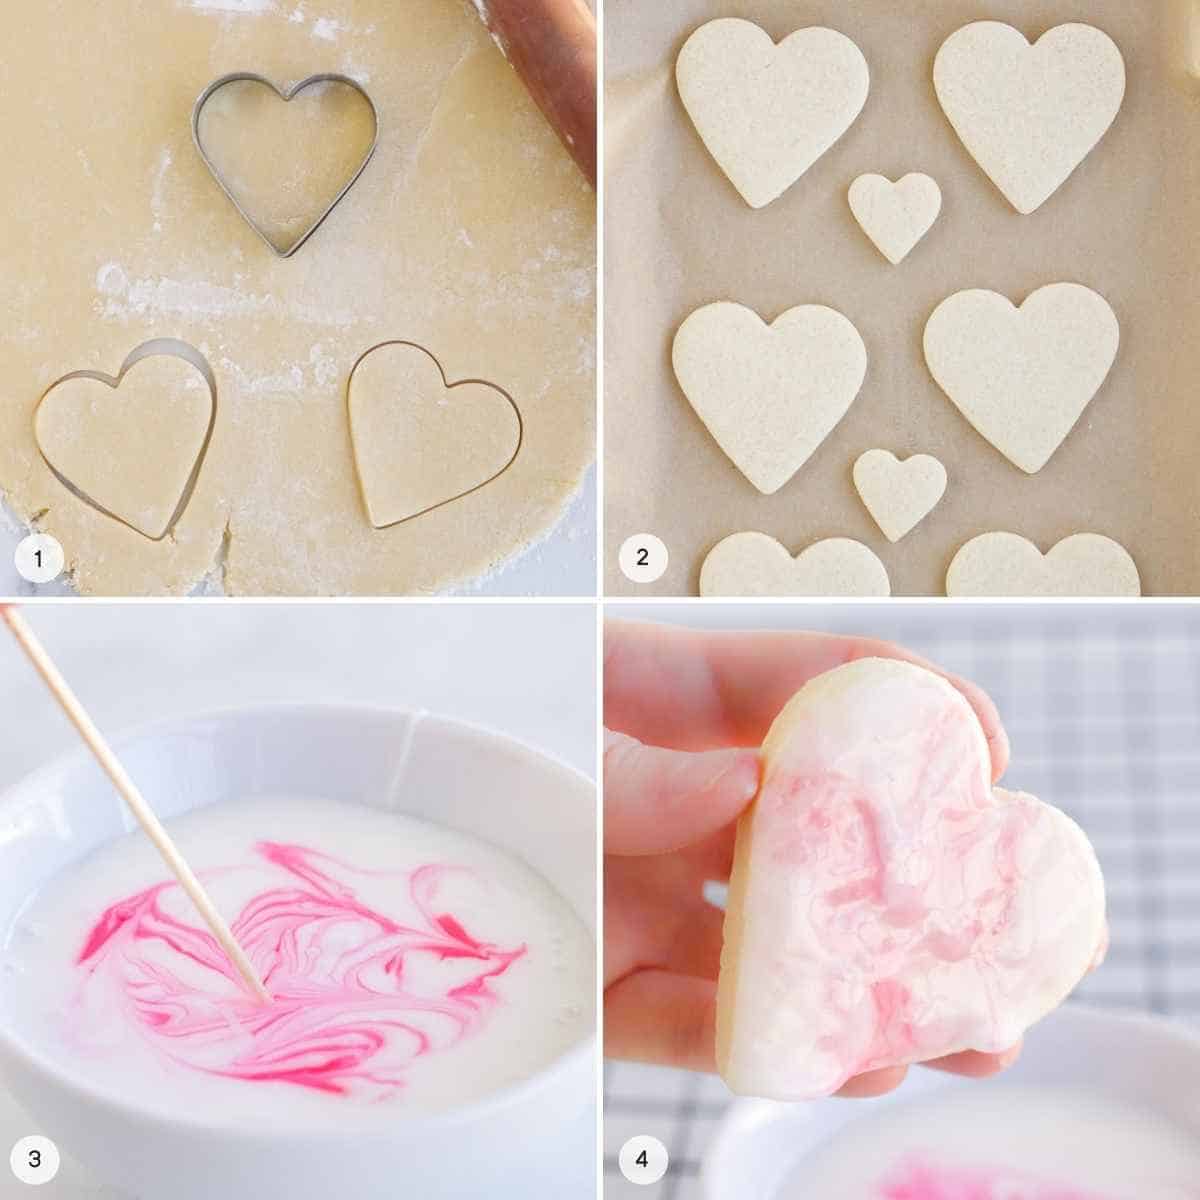
- Remove the dough from the refrigerator and cut into desired shapes. Re-roll the extra dough edges and cut them with a cookie cutter until all of the dough is used up. If the dough becomes very soft, put it back in the refrigerator to chill. The dough should be cold when going into the oven.
- Bake for 10-12 minutes or until the cookies are set. Allow cookies to cool on the baking sheet for 5 minutes. Then transfer to a cooling rack to cool completely before decorating them.
To make the glaze icing:
- Start by whisking the sifted confectioners’ sugar, milk and corn syrup in a small bowl. Change the ratios of milk and confectioners’ sugar to adjust consistency, but bare in mind that the icing should be quite thick.
- Squeeze a small amount of food coloring into the glaze icing and use a toothpick or a bamboo skewer to drag the color across the surface.
- Dip each cookie into the glaze icing, allowing access to drip off.
- Place the cookies on a plate or cooling rack and allow the icing to set for about one hour. Until then, do not cover the cookies. Once the icing is set, you can enjoy the cookies or offer them as a great homemade gift! For other amazing edible homemade gifts, check my Easy Mocha Chocolate Truffles.

How to Store Valentine’s Day Marble Cookies?
You can store decorated marble cookies or plain cookies in a covered container at room temperature for up to 5 days. Alternatively, you can store them in an airtight food container in the fridge for up to 10 days. This is the time period when the cookies stay nice and soft.
Freezing: You can freeze decorated or plain cookies in a freezer-friendly container for up to 3 months. Put parchment paper between the cookies’ layers so they don’t stick to the next touching layer. Thaw at room temperature or in the refrigerator.
You can also freeze the cookie dough for up to 3 months by wrapping rolled-out dough with plastic wrap and then placing it in an airtight container or plastic bag. Thaw in the refrigerator for at least one hour before working with it.
You can store the glaze icing for up to 2 days in the refrigerator in an airtight container. Bring to room temperature before using.

Expert Tips
- Correctly measure out the flour – either weigh it using an electronic kitchen scale or spoon and level it with a knife but don’t pack the flour in the measuring cup.
- Do not substitute a stick of butter with a butter spread as the latter contains more oil and water in it and won’t give you the needed dough consistency that should be soft and thick.
- Make sure that eggs are at room temperature so they mix better with the rest of the ingredients.
- Chill the rolled dough in the refrigerator and do not try speeding up the process by chilling them in the freezer as it won’t chill evenly.
- You can refrigerate the dough for up to 48 hours.
- If the chilled dough starts to crack when you start cutting it, let it sit in room temperature to soften up a bit.
- Don’t overbake the cookies. If they are golden brown, it means they were baked for too long. They are done when they are set and no longer shiny, so don’t wait for the edges to turn.
- If you prefer crunchier cookies rather than soft, leave them for one more minute in the oven.
- In my experience, gel food coloring works best to decorate marble cookies.
- This icing is really interesting. Each time it differs based on the ratio of milk to confectioners’ sugar. The cookies’ decoration varies accordingly. Note that the consistency of the icing should be quite thick.
- If the glaze icing is too thick, add one teaspoon of milk. If it’s too thin, add one teaspoon of confectioners’ sugar.
- Allow the cookies to completely cool before decorating them, otherwise the icing will melt.
For other Valentine’s Day desserts, check out these amazing recipes:
- Red Velvet Cupcakes
- White Chocolate Fudge
- No-Bake Vegan Chocolate Cheesecake
- Instant Pot Cheesecake
- Brownie Batter Hummus
For more delicious and nourishing recipe ideas, click here. Also, make sure to check out my other desserts recipes.
If you try this recipe, please don’t forget to rate it and share a picture on social media, tagging #NourishPlate in your posts. I would really love to see your creations. Bon appetit!
Valentine’s Day Marble Cookies
Equipment
- Heart-shaped cookie cutter
- Rolling Pin
- Baking sheet
- Parchment paper or silicon baking mats
- Cooling rack
- Measuring cups
Ingredients
Cookies
- 1 cup unsalted butter softened
- 1 cup granulated sugar
- ½ teaspoon salt
- 2 large eggs room temperature
- 1 ½ teaspoons pure vanilla extract
- 3 ½ cups all-purpose flour divided
Glaze Icing
- 3 cups confectioners' sugar sifted
- 4-5 tablespoons milk
- 1 tablespoon corn syrup
- Gel Food Coloring
Instructions
To make the dough:
- In a large bowl, beat the butter and sugar with an electric mixer on medium speed.
- Add the eggs, vanilla and salt and continue blending until thoroughly combined.
- Slowly add the flour and continue mixing until combined.
- Roll the dough on parchment paper or silicone baking mats about a half of an inch thick and place it on baking sheets and let chill in the refrigerator for 1-2 hours slightly covered. Chilling the dough is important to get a sharp and precise shapes. Note that the dough can be refrigerated for up to 48 hours.
- While the dough is chilling, preheat the oven to 350°F/180°C degrees.
- Remove dough from the refrigerator and cut into desired shapes. Re-roll the extra dough edges and cut them with cookie cutter until the dough is used. If the dough becomes very soft, put back to the refrigerator to chill. The dough should be cold when going in the oven.
- Bake for 10-12 minutes or until the cookies are set.
- Allow cookies to cool on the baking sheet for 5 minutes. Then transfer to a wire rack to cool completely before decorating them.
To make the glaze icing:
- Start by whisking the sifted confectioners' sugar, milk and corn syrup in a small bowl. Change the ratios of milk and confectioners' sugar to adjust consistency, but bare in mind that the icing should be quite thick.
- Squeeze a small amount of food coloring into the glaze icing and use a toothpick or a bamboo skewer to drag the color across the surface.
- Dip each cookie into the glaze icing, allowing access to drip off.
- Place the cookies on a plate or cooling rack and allow the icing to set for about one hour. Until then, do not cover the cookies. Once the icing is set, you can enjoy the cookies or offer them as a great homemade gift!
Notes
- Correctly measure out the flour – either weigh it using an electronic kitchen scale or spoon and level it with a knife but don’t pack the flour in the measuring cup.
- Do not substitute a stick of butter with a butter spread as the latter contains more oil and water in it and won’t give you the needed dough consistency that should be soft and thick.
- Make sure that eggs are at room temperature so they mix better with the rest of the ingredients.
- Chill the rolled dough in the refrigerator and do not try speeding up the process by chilling them in the freezer as it won’t chill evenly.
- You can refrigerate the dough for up to 48 hours.
- If the chilled dough starts to crack when you start cutting it, let it sit in room temperature to soften up a bit.
- Don’t over-bake the cookies. If they are golden brown, it means they were baked for too long. They are done when they are set and no longer shiny, so don’t wait for the edges to turn.
- If you prefer crunchier cookies rather than soft, leave them for one more minute in the oven.
- In my experience, gel food coloring works best to decorate marble cookies.
- This icing is really interesting. Each time it differs based on the ratio of milk to confectioners’ sugar. The cookies’ decoration varies accordingly. Note that the consistency of the icing should be quite thick.
- If the glaze icing is too thick, add one teaspoon of milk. If it’s too thin, add one teaspoon of confectioners’ sugar.
- Allow the cookies to completely cool before decorating them, otherwise the icing will melt.
Nutrition
This website provides approximate nutrition information for convenience and as a courtesy only. Nutrition data is gathered primarily from the USDA Food Composition Database, whenever available, or otherwise other online calculators.
did you make this recipe?
Make sure to follow on Pinterest @nourishplate and on Instagram @nourishplate


Comments & Reviews
Tammy Goodman says
Delicious and easy to do. The corn syrup adds a little more sugar to the glaze and provides a glossy finish.
Ruth Startzman says
Can these be made gluten free and dairy free?