
Stained Glass Cookies are so pretty that they’ll impress everyone who sees them! They are crispy, buttery and beautiful. These cookies can be cut into festive shapes and filled with desired colors to match your occasion! They also make a great homemade gift idea for the people you love!

Not only these cookies are perfect for Valentine’s day, they are also great to add to the cookie tray this year! For other cookie recipes, try my Chocolate Peppermint Cookies, Grinch Cookies and these easy Marble Cookies! For amazing desserts to be served for a special occasion, try these Mocha Chocolate Truffles.
This stained glass cookie recipe is a great activity to make with children. They will adore the result! Also, you can offer them as pretty party favors.
This recipe is vegetarian and takes only an hour and a half from start to finish. Once you make it, it’ll become your go to cookie recipe!
Why This Recipe Works
- So Easy. You don’t have to be an experienced baker to nail these cookies! All what you need to do is to cut a shape from the cookie dough. Transfer it to the baking sheet and cut a smaller shape. Then you need to add the finely crushed candies in the middle and bake. It’s that easy!
- Few Basic Ingredients. You only need 7 ingredients to make these cookies. I bet they are ingredients you already have in your pantry. You might only need to go out and buy Jolly Ranchers Hard Candy.

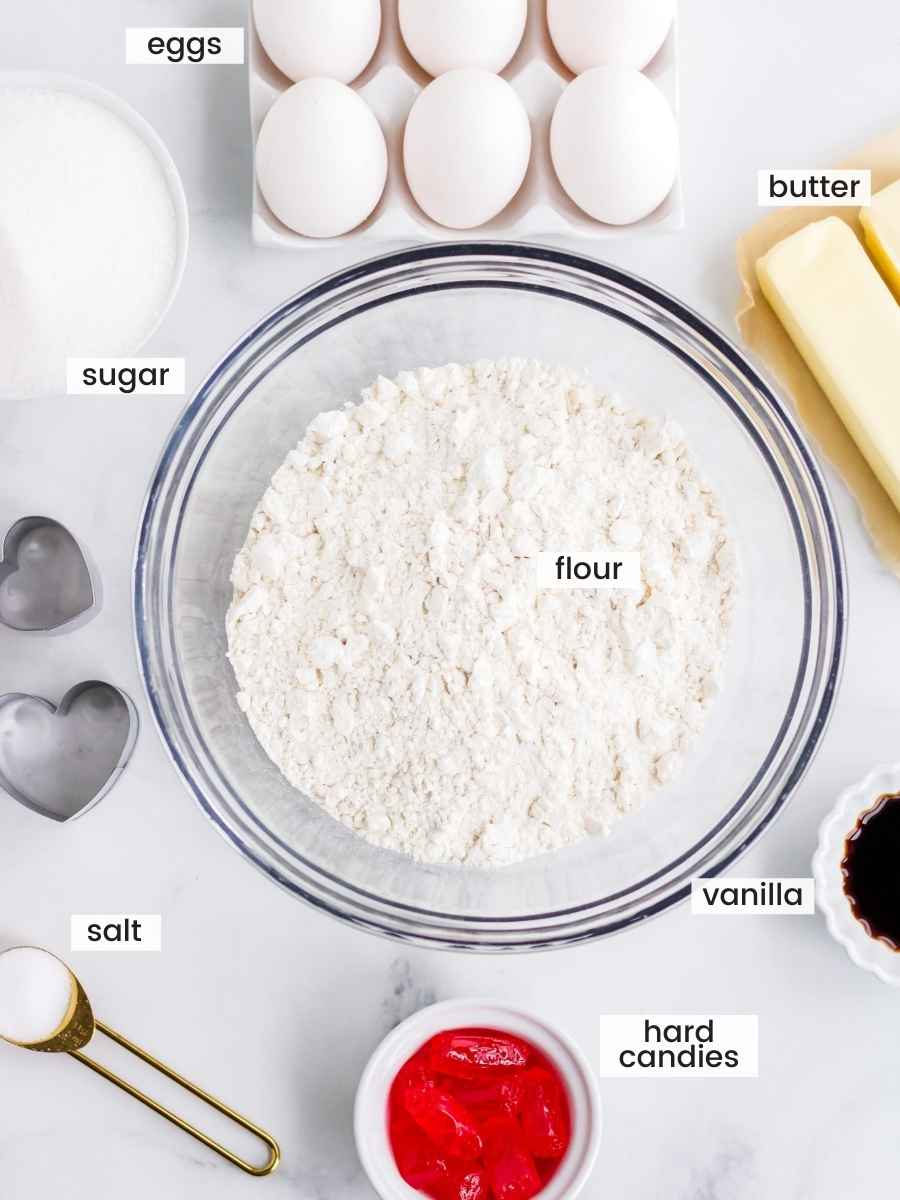
Ingredients
- Butter and sugar. This is what makes the base for the cookies recipe.
- Vanilla and salt. Use a good quality pure vanilla extract for better flavor.
- Eggs. Always use eggs at room temperature for baking. This will allow it to incorporate better in the cookie dough.
- Flour.
- Hard Candies. Choose hard candies in desired colors for your occasion. I use this Jolly Ranchers Hard Candy.
How To Make Stained Glass Cookies
- Mix the wet: In a large bowl, using a mixer, cream together the butter and granulated sugar until light and fluffy – about 2 minutes on medium-high speed. Then, add the egg, vanilla extract and salt. Mix just until smooth and combined.
- Make the dough: Gradually add the flour to the cream. Mix just until no large lumps of dry ingredients remain.
- Chill: Cover the dough and place in the refrigerator for one hour.
- Prep your oven: Preheat oven to 350°F/180°C. Line sheet pans with silicone liners (or parchment paper). However, the melted hard candy can stick to some brands of parchment paper, so try using silicone liners if possible.
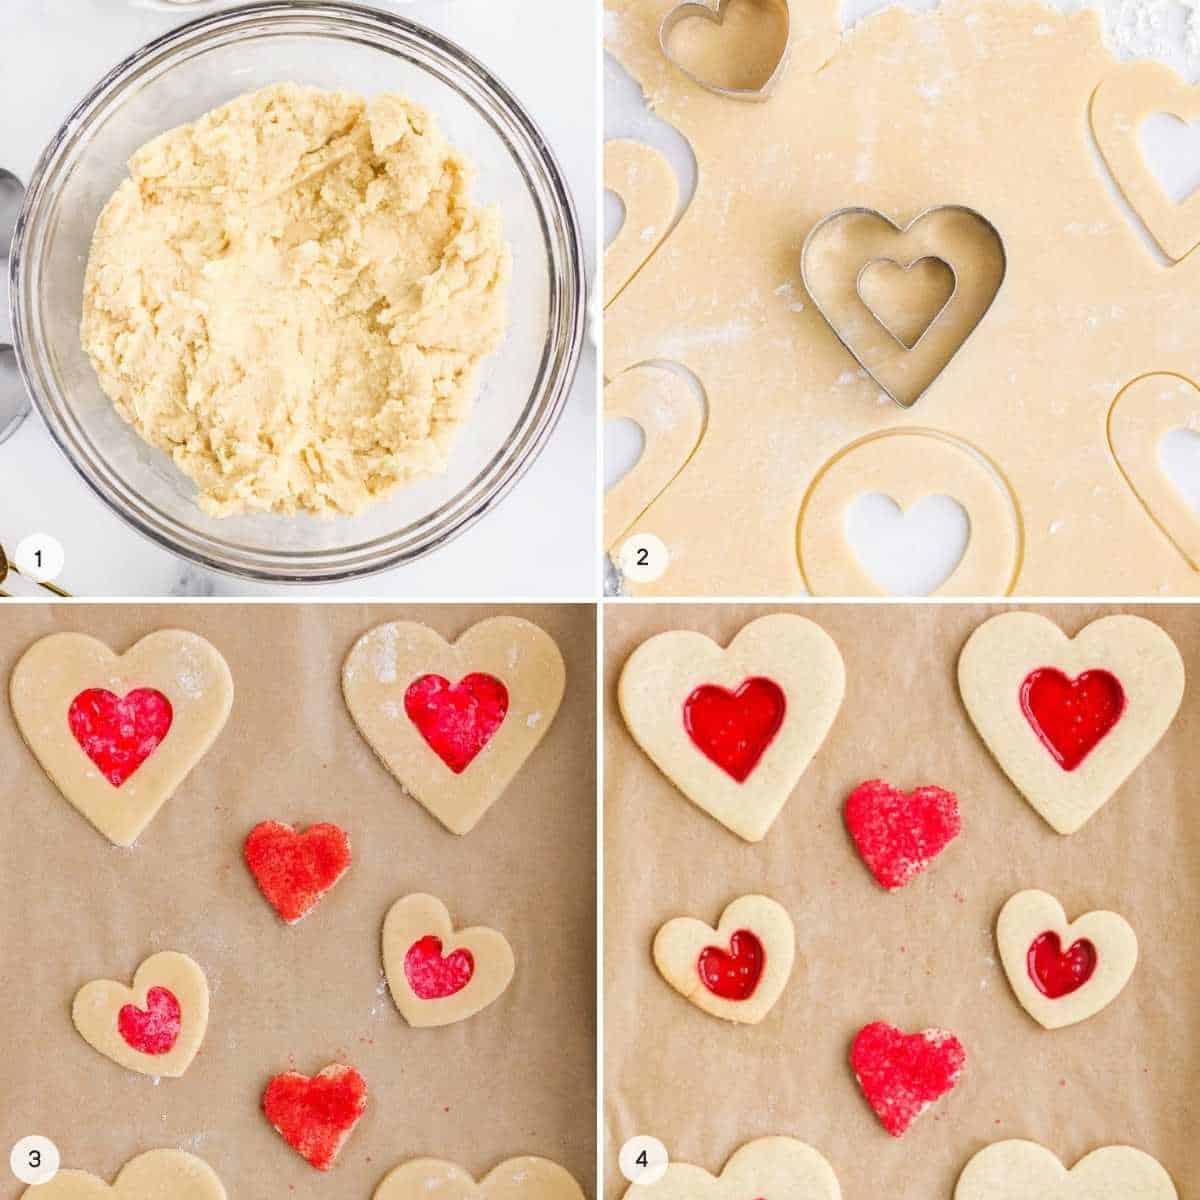
- Roll out the dough: Remove dough from the refrigerator and roll out onto a floured surface about ¼ of an inch thick.
- Cut into shapes: Cut into desired shapes. Transfer to the baking sheet, cut out hollow areas with a smaller cookie cutter and remove using a toothpick. You can cut a small circle at the top of the cookie using a straw, if you are planning to hang it as a decoration. Re-roll and cut scrap dough.
- Hard candies: Separate candies by color, before putting them in a bag and crush them into small pieces. Then, place in the hallowed out areas, filling about ¾ of the way.
- Bake: Bake for 10-12 minutes, or until the cookies are set and candy centers are melted.
- Cool and serve: Allow for the cookies to completely cool before serving. Enjoy!
Tips For Making Stained Glass Cookies
- Always use eggs at room temperature for baking. This will allow it to incorporate better in the cookie dough.
- For best results, use a good quality pure vanilla extract.
- If cookie dough gets warm while rolling it and cutting into shapes, it’s better to chill it before continuing working with it.
- Choose hard candies in desired colors for your occasion. I use this Jolly Ranchers Hard Candy.
- You’ll need to separate the hard candies into each color before finely crushing them.
- To finely crush the hard candies, you can use a meat mallet.
- Try to finely crush hard candy, as big chunks can cause an overflow of the middle of the cookie.
- Fill about ¾ of the centers with finely crushed hard candy.
- You can cut a small hole at the top of the cookie in order to hang it as a decoration. For that, simply use a straw to cut a small circle on each cookie. When baked and cooled, pass a ribbon to hang the cookie.
- Use silicone liners – if possible – to line baking sheets. As the melted hard candy can stick to some brands of parchment paper.
- Use a toothpick to easily remove the cut out hallow areas from the center of the cookies.
- For extra flavor in the cookies, you can add 1 teaspoon lemon or orange zest if desired.
- Keeping the hard candy in a thin layer makes the cookies easier to eat. As otherwise, the centers will be difficult to bite.
Frequently Asked Questions
You can store the cookies after allowing them to completely cool on a cooling rack to room temperature. Store in an airtight container for up to 5 days.
You can safely freeze the dough in a freezer safe bag or container up to 2 months. Allow to thaw before working with the dough.
However, freezing cooked cookies might not work well, as the centers could crack upon thawing the cookies and then fall apart.
You can use any shape that you like that suits your occasion. The only thing you’d need to consider when choosing the shape, is to have a large cookie cutter and a smaller one. Both cookie cutters could have the same shape, but not necessarily. Be creative and don’t be afraid to try out different creations!
Recommended Tools
Here’s what I use and recommend to bake these beautiful cookies:
- Sheet pan or baking sheet: I use half size Nordicware sheet to bake cookies and roast veggies. They are durable and never rust. They allow food to cook evenly and are easy to clean.
- Silicone liners: It is particularly advisable to use these lines for this recipe. As melted hard candy can stick to some brands of parchment paper. In order to avoid this from happening, try using silicone liners when possible.
- Stand mixer: I’ve been using this KitchenAid hand mixer for many years now and I’d recommend it as a reliable kitchen equipment. It has 9 speeds and a soft start feature to help preventing ingredients from splattering.
- Silicone spatula: this is my favorite spatula that I always use.
- Mixing bowls: I love using these Pyrex glass bowls. They are transparent which allows you to see through all the ingredients and how they’re being mixed. The bowls come in different sizes and nest one into another to save space.
- Measuring cups and spoons: these are my favorite ones that I use in my kitchen every day.
- Cookie cutters: You can use any shape that you like which suits your occasion. The only thing you’d need to consider when choosing the shape, is to have a large cookie cutter and a smaller one. This is my favorite cookie cutters set that I use for most occasions.

Did you make this? Be sure to leave a review below and tag me on Facebook, Instagram, or Pinterest!

Stained Glass Cookies
Ingredients
- 1 cup unsalted butter softened
- 1 cup granulated sugar
- ½ teaspoon salt
- 2 large eggs room temperature
- 1 ½ teaspoons pure vanilla extract
- 3 ½ cups all-purpose flour divided
- 24 Clear Hard Candies in desired colors
Instructions
- In a large bowl, cream together the butter and sugar with an electric mixer on medium speed.
- Add the eggs, vanilla and salt and continue blending until thoroughly combined.
- Slowly add the flour, mixing just until combined.
- Cover the dough and place in the refrigerator for one hour.
- While the dough is chilling, preheat the oven to 350°F/180°C and line sheet pans with silicone liners (or parchment paper – however, the melted hard candy can stick to some brands of parchment paper so try using silicone liners if possible).
- Remove dough from the refrigerator and roll out onto a floured surface about ¼ of an inch thick.
- Cut into desired shapes and transfer to the baking sheet. Then cut out hollow areas and remove using a toothpick.
- Re-roll and cut scrap dough.
- Place the candy in the hollowed out areas, filling about ¾ of the way.
- Bake for 10-12 minutes or until the cookies are set and the candy centers are melted.
- Allow to cool on the baking sheet until the candy is completely cooled.
Notes
- Always use eggs at room temperature for baking. This will allow it to incorporate better in the cookie dough.
- For best results, use a good quality pure vanilla extract.
- If cookie dough gets warm while rolling it and cutting into shapes, it’s better to chill it before continuing working with it.
- Choose hard candies in desired colors for your occasion. I use this Jolly Ranchers Hard Candy.
- You’ll need to separate the hard candies into each color before finely crushing them.
- To finely crush the hard candies, you can use a meat mallet.
- Try to finely crush hard candy, as big chunks can cause an overflow of the middle of the cookie.
- Fill about ¾ of the centers with finely crushed hard candy.
- You can cut a small hole at the top of the cookie in order to hang it as a decoration. For that, simply use a straw to cut a small circle on each cookie. When baked and cooled, pass a ribbon to hang the cookie.
- Use silicone liners – if possible – to line baking sheets. As the melted hard candy can stick to some brands of parchment paper.
- Use a toothpick to easily remove the cut out hallow areas from the center of the cookies.
- For extra flavor in the cookies, you can add 1 teaspoon lemon or orange zest if desired.
- Keeping the hard candy in a thin layer makes the cookies easier to eat. As otherwise, the centers will be difficult to bite.
Nutrition
This website provides approximate nutrition information for convenience and as a courtesy only. Nutrition data is gathered primarily from the USDA Food Composition Database, whenever available, or otherwise other online calculators.
did you make this recipe?
Make sure to follow on Pinterest @nourishplate and on Instagram @nourishplate


Leave a Review!