
These Easter Egg Sugar Cookies are easy to make and so much fun to decorate! They’re perfect for baking with kids and don’t require any dough chilling. Just roll, cut, bake, and decorate with bright, colorful royal icing.

My favorite type of cookies is no chill cookies. Most cut-out sugar cookie recipes require chilling time, but not this one! You can make these cookies in under an hour from start to finish, and decorate them too.
You only need one simple cookie cutter that you probably already have, and a pipping bag to decorate the cookies with royal icing. So no special equipment is needed here.
I made these with my kids, and they LOVED decorating them! Let me know if you try them.

Why This Recipe Works
- No Chill Dough. As I mentioned above, this cookie dough doesn’t need to be chilled. Just mix, roll, cut, and bake!
- No Raw Eggs in the Icing. I make my royal icing with meringue powder instead of raw egg whites, it’s safer and easier to work with.
- Custom Designs. I kept it simple with dots, lines, and zig-zags, but you can get as creative as you like with your decorations!
Key Ingredients
Here’s what you’ll need to make sugar cookies:
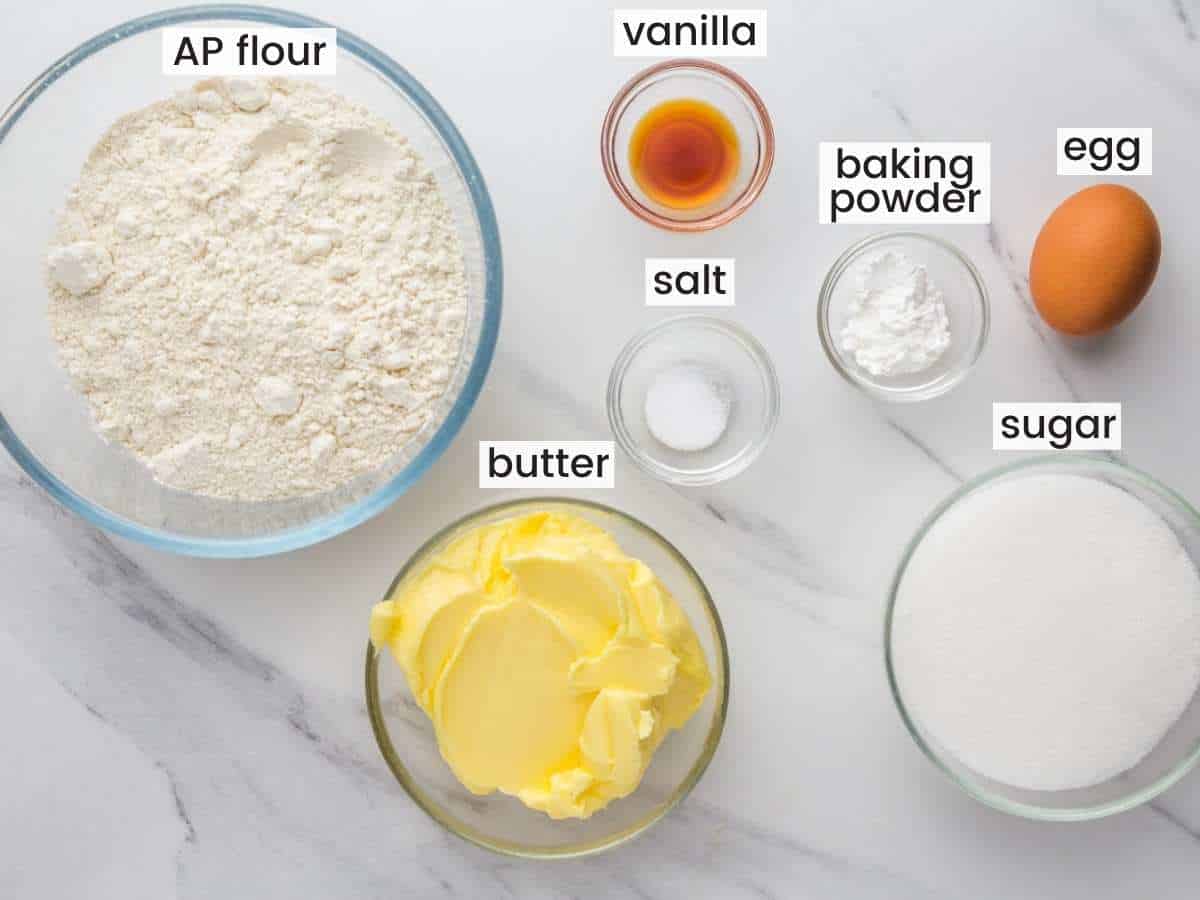
- Butter. Use unsalted softened butter, remember to take it out of the fridge at least an hour before you start baking. Avoid using shortening.
- Flour. We’re using simple all purpose flour (plain flour in the UK), nothing fancy is needed here!
- Sugar. White granulated sugar is great in this recipe. Do not try to reduce it though and it will alter the texture of the cookies.
- Egg. Always use large eggs for baking, make sure that they’re at room temperature to incorporate easily into the cookie dough. You only need one egg here.
- Baking Powder and Salt. This is out leavener in this cookie recipe, also add a pinch of salt to balance the flavors of the cookies.
- Vanilla. Use the good stuff, no imitation, please!
How To Make Easter Egg Sugar Cookies
Scroll down to the recipe card for the detailed instructions, but I’ll also walk you through the steps briefly here.
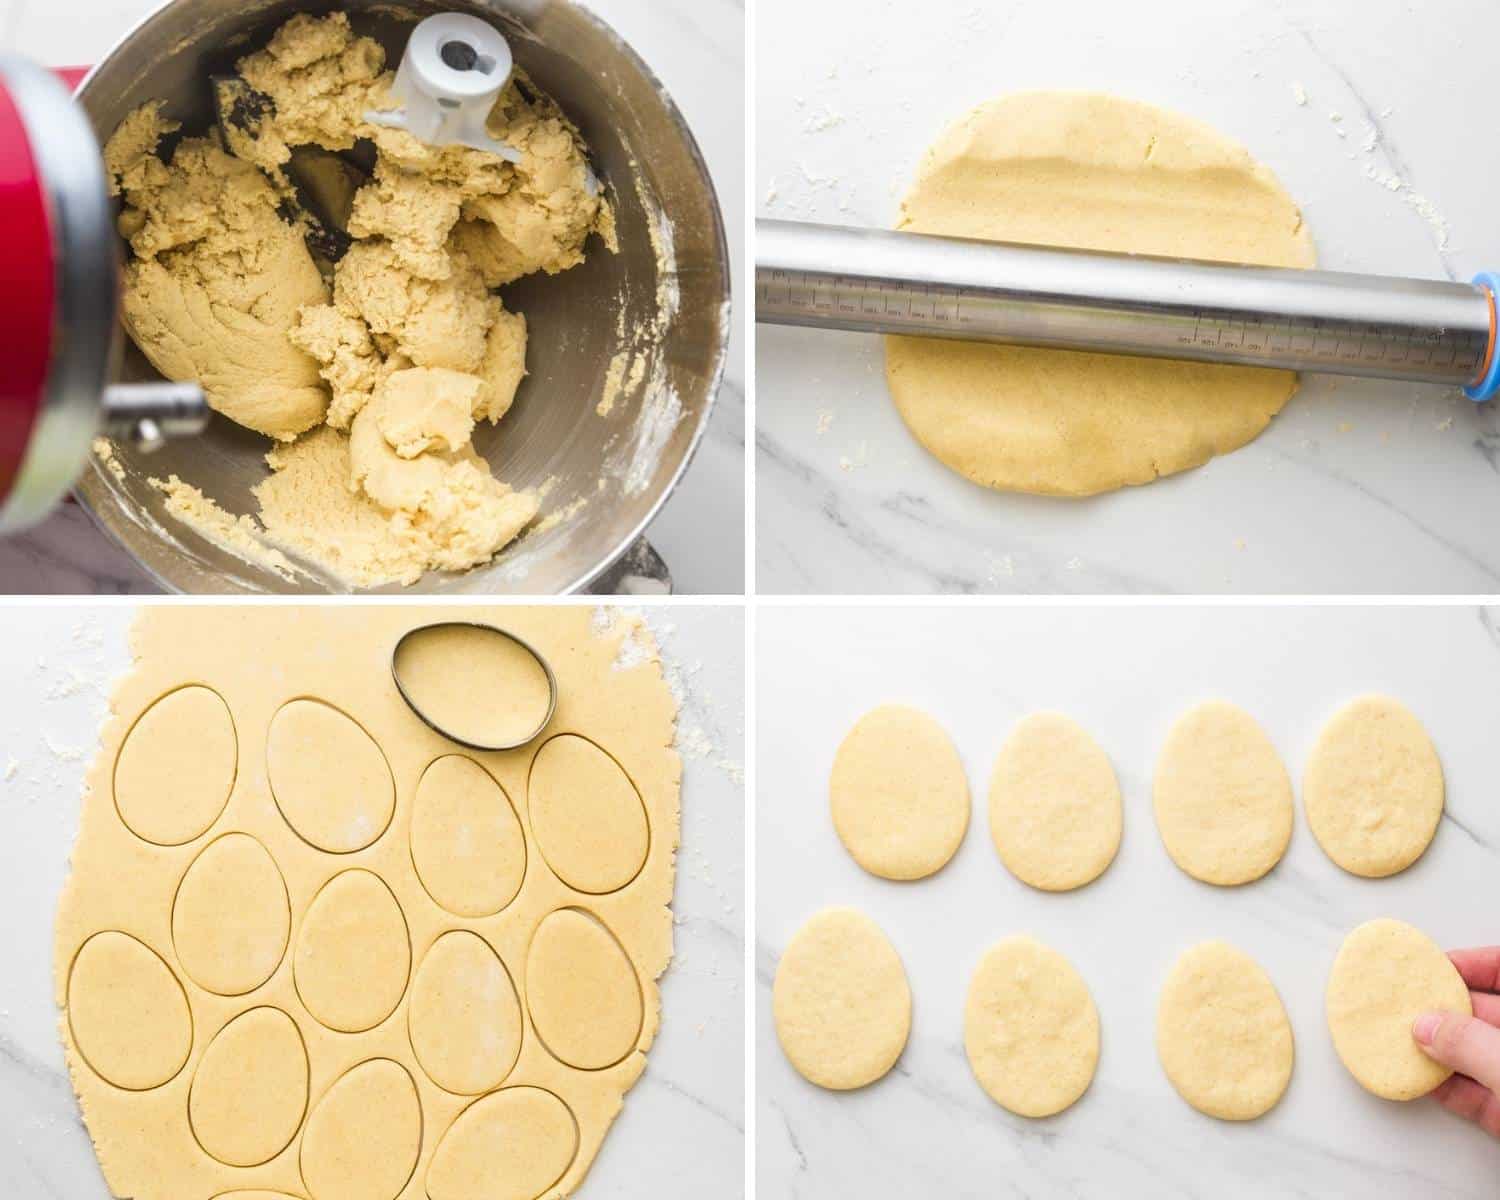
- Preheat the oven and line 2 cookie sheets with parchment paper or a Silpat mat.
- Using a stand mixer, cream the butter with the sugar until smooth and creamy. This should take about 2-3 minutes.
- Add the egg and the vanilla, and briefly beat until incorporated.
- Add the dry ingredients and mix again until just combined.
- Divide the cookie dough into 4 portions, and roll out into ¼ inch thickness. Cut out the shapes and bake for 8-9 minutes. Remove from the oven and allow to cool completely before decorating.
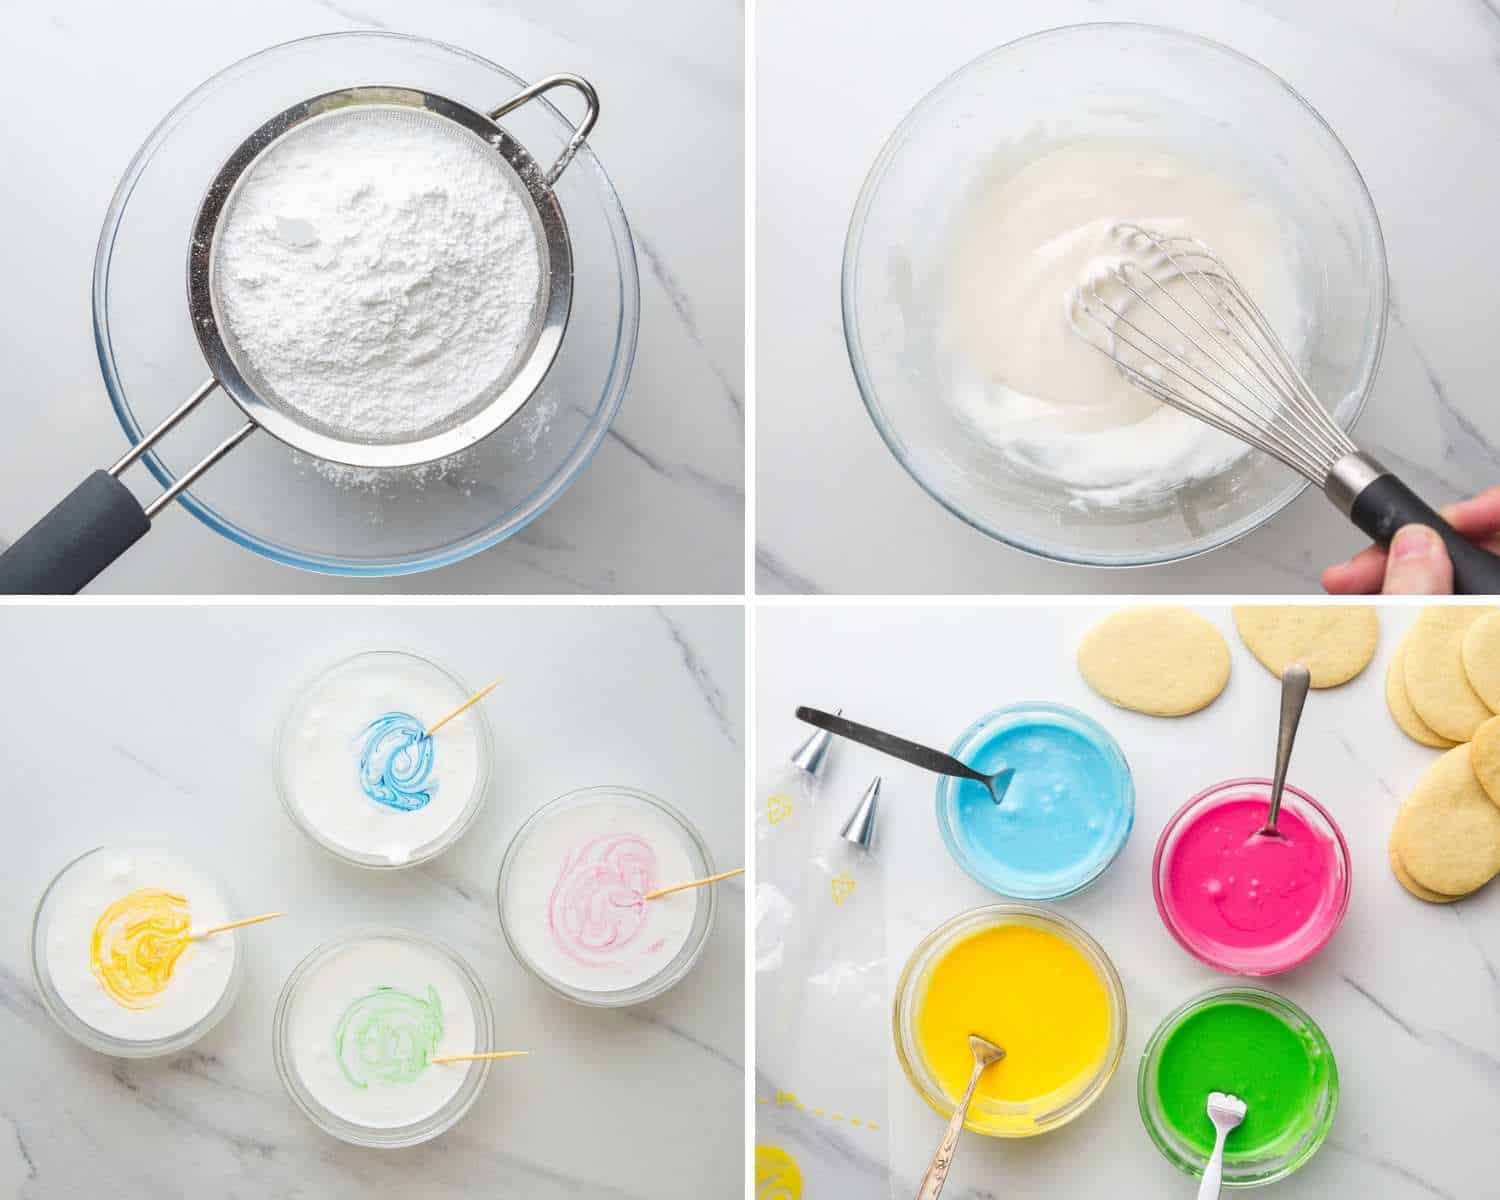
For the Royal Icing:
- Sift the powdered sugar, and mix it with meringue powder and water until combined. You do NOT want to overmix this, the icing becomes dull (not shiny) if you overmix it.
- Divide between balls, and add food coloring. I like to use gel food coloring as it does not dilute the mixture, and the colors are always bright and beautiful!
- Add icing to disposable piping bags, outline and flood each cookie with your desired colors. Allow the icing to set, and then add the top designs for decoration. Allow to set completely for at least 2 hours at room temperature but preferably overnight.

Tips For Making Cookies and Royal Icing
- Do not overbake the cookies. These cookies hold their shape nicely, but they’re also meant to be soft and melt in your mouth when you eat them. Once the edges start to brown slightly, remove the cookies from the oven immediately.
- Allow the cookies to cool completely. If you ice the cookies too soon, the royal icing will heat up and start melting and you do not want that. So make sure to allow the cookies to cool completely before icing them.
- Don’t overmix the Royal Icing. It’s important to mix the royal icing until just combined; if you beat or whisk it for too long, it will lose its shine.
- Make two different consistencies for Royal Icing. Typically you’d want a thicker consistency for outlining the cookie, and a thinner one to flood it. I did a 15-second (medium) royal icing for outlining, and 8-10 seconds for flooding.
Easter Egg Sugar Cookies
Equipment
- 2 cookie sheets
- Parchment paper or silicone baking mats
- Stand mixer with paddle attachment
- Rolling Pin
- Egg-shaped cookie cutter (10 cm)
- Piping Bags
- Piping tips (optional, size #2 recommended)
- Offset spatula
- Wire rack
Ingredients
For the Sugar Cookies:
- 1 cup unsalted butter softened (225 g)
- 1 cup granulated sugar 200 g
- 1 teaspoon pure vanilla extract
- 1 large egg at room temperature
- 3½ cups all-purpose flour 420 g
- 1½ teaspoons baking powder
- ½ teaspoon salt
For the Royal Icing:
- 3 cups powdered sugar 360 g
- 2 tablespoons meringue powder
- 6-7 tablespoons water
- Gel food coloring assorted colors
Instructions
Make the Sugar Cookies
- Preheat the oven to 350°F (180°C). Line two cookie sheets with parchment paper or silicone mats and set aside.
- Cream the butter and sugar using a stand mixer fitted with the paddle attachment. Beat on medium speed until smooth, light, and fluffy, about 2–3 minutes.
- Add the vanilla and egg. Mix until just combined. Do not overmix.
- Add dry ingredients. Mix in flour, baking powder, and salt. Scrape down the sides of the bowl with a spatula. The dough should pull away from the sides – if it’s too soft, add up to ½ cup more flour.
- Roll out the dough. Divide into 4 portions and roll each one to ¼ inch (6 mm) thickness. Cut out cookies using an egg-shaped cutter and transfer to the prepared sheets using an offset spatula.
- Bake for 8-9 minutes. Rotate the trays at the 6-minute mark for even baking. The edges should be just barely golden. Cool on the sheet for 5 minutes, then transfer to a wire rack to cool completely before decorating.
Make the Royal Icing
- Mix icing. In a bowl, combine powdered sugar, meringue powder, and 6 tablespoons of water. Mix until just combined-do not overmix, or the icing may lose its shine. Add more water if needed, 1 teaspoon at a time.
- Adjust consistency. For outlining, use a 15-second consistency icing. For flooding, use 8-10 second consistency. (To test: drag a knife through the icing and count how many seconds it takes to smooth out.)
- Divide icing into bowls and add gel food coloring. Transfer to piping bags (with or without tips) and decorate cookies. Outline first, flood, then add designs once the base has set slightly.
- Dry completely. Allow cookies to dry at room temperature for at least 2 hours-preferably overnight-before stacking or storing.
Notes
- Store cookies in an airtight container at room temperature for up to 2 weeks.
- Freeze undecorated or decorated cookies in a sealed container for up to 3 months.
- Avoid overbaking for soft, tender cookies.
- Don’t ice warm cookies, wait until fully cooled.
Nutrition
This website provides approximate nutrition information for convenience and as a courtesy only. Nutrition data is gathered primarily from the USDA Food Composition Database, whenever available, or otherwise other online calculators.
did you make this recipe?
Make sure to follow on Pinterest @nourishplate and on Instagram @nourishplate
Frequently Asked Questions
Store these cookies at room temperature for up to two weeks. You can also freeze the cookies (decorated or not) in a sealed container for up to 3 months.
You can make these cookies and decorate them within 7 days. Store at room temperature.

I hope that you enjoy these cookies as much as I do! They’re so simple but are fun to make, and can make a great gift too! Don’t forget to pin this recipe to easily find it later.
Did you make this? Be sure to leave a review below and tag me on Facebook, Instagram, or Pinterest!


Leave a Review!